Flutter Wings Tutorial
Wouldn't it be nice if flutter wings weren't so fragile? If flutter ponies
with wings weren't so rare? But let's face it, original wings are beyond
the reach of most of us.
I spent quite a while searching for replacement flutter wings on the
web. There *are* flutter wings out there to buy, but in the end I decided
it would be cheaper and more fun to make my own.
When I had a go, I was amazed by how easy it was.
So I thought I'd provide a step-by-step guide to making replacement flutter
wings for you.
Be careful, have fun, and enjoy your flutter wings!
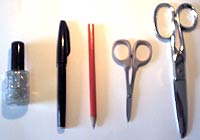
Before you start, you will need to assemble the following tools:
-
A pair of small scissors
-
A pair of larger scissors or a craft knife
-
A pen and pencil
-
Paint for the flutter wings (I use glittery nail polish - I find
that the bigger the glitter pieces, the better the finished result
- I know that some people use acrylic paint instead)
-
Templates for your flutter wings - to make this easy for you, I have
drawn up some flutter wing templates which
you can print out and cut out yourself - they're in PDF format so
you should be able to use them without problems.
Note: some people have reported that the wings print out a little
small. No problem - but while I fix this, you may want to make them
a little bigger.
Note 2: If you have a problem reading the PDF file, you can see a
gif of the wings here which you should be
able to print.
-
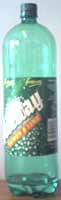
Material for the flutter wings - I am going to use the top of a round
2l fizzy drink bottle - the curved top gives a lovely authentic look
to the wings. If you do this, make sure you rinse the bottle out well
beforehand - you don't want to get sticky!
-
Some strong glue - I use Superglue but any strong adhesive should
work.
 |
 |
I'm going to make a pair of green wings for Wind Drifter, with glitter
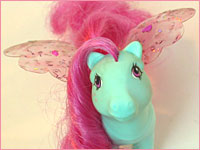
on them, as she requested. Here she is beforehand, with no wings:
She's pretty, but lacking that certain... something.
Here we go:
Cover your work surface with newspaper or scrap paper to protect it while
you work.
Very carefully cut the top off your drinks bottle with the big scissors
or the craft knife. Watch your fingers! Baby ponies should get an adult
to help them with this part.
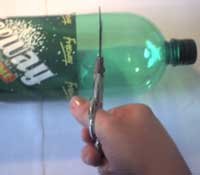 |
N.B. You should hold the bottle securely while you're cutting it
- I'm not because I'm holding my camera, but I am also not cutting
- just posing!
|
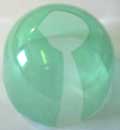 Once
you have the top of your bottle, you need to cut up the side of it towards
the cap, then around the cap to remove it. You should end up with something
like this: Once
you have the top of your bottle, you need to cut up the side of it towards
the cap, then around the cap to remove it. You should end up with something
like this:
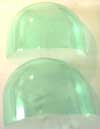
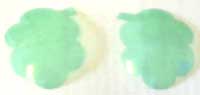
Then you need to cut the bottle piece in half, and then half again:
You should end up with four curved pieces. You can put two aside for
now - they can be the wings for your next pony!
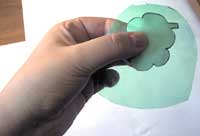
Now comes the fiddly bit.
Take one of the bottle pieces, and take your chosen flutter wing shape.
Wind Drifter chose the classic Flutter design.
Hold the flutter template firmly against the bottle piece. Now you need
to cut around the template shape with the small scissors (this is so fiddly
that I use a small pair of nail scissors). If you like, you can hold the
template in place with a piece of double-sided tape.
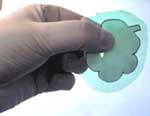
Repeat this with the other bottle piece. Make sure the flutter wing template
is the opposite way up, so the curve is on the other side - otherwise
you'll have two wings the same (I speak from experience!)
You should now have two curved flutter wing shapes. It's beginning to
get exciting, isn't it!
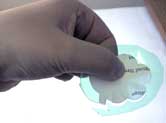
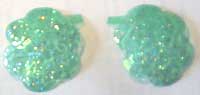
Now the fun bit. Time for painting.
I use clear nail varnish with glittery bits in it. I find this avoids
streaking, and gives the nicest finish.
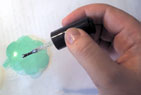
I use rough, splodgy strokes, and I put on quite a thick coat. This gives
the wings quite a nice textured finish.
When you've painted your wings, put them in a safe place out of the way
to dry. I recommend leaving them overnight to make sure - it's surprising
how long nail polish in particular takes to dry properly. Especially if
it's a thick coat.
Ooh, isn't this exciting! Wind Drifter is getting very agitated now!
Still, she'll have to wait 'til tomorrow to get her wings fixed in place
- or she might scratch them!
**The Next Day**
Right, now the wings are dry. The next thing to do is check that the
tabs fit your pony nicely. They may need to be trimmed so they lie properly.
When you're happy with them, it's time to glue them on!
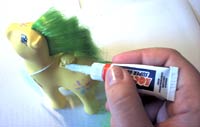 Remove
the wings from the wing tabs. Take your glue, and put a drop in one of
the tabs. Careful not to get the glue on your pony! You now need to hold
your pony's wing in place until the glue is set firmly enough. Patience
is good here. If you're using superglue or a similar glue, this part may
take some time. Remove
the wings from the wing tabs. Take your glue, and put a drop in one of
the tabs. Careful not to get the glue on your pony! You now need to hold
your pony's wing in place until the glue is set firmly enough. Patience
is good here. If you're using superglue or a similar glue, this part may
take some time.
When your first wing is set in place, repeat with the other wing.
Leave your pony in a safe place to finish drying. This will also give
her time to get used to the feel of her new wings.
When you're sure that your pony's wings are dry, you can flutter them.
Congratulations! You've made one little pony very happy!
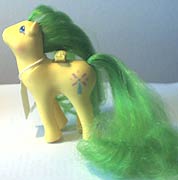
See the finished wings! >>
|